INTRODUCTION
The Musa (Blader) class is a traditional samurai with a female counterpart named “Maehwa”. There are a couple skill differences to the Musa class, which change the play style completely. They wear light armor and use a sword as their primary weapon with a horn bow as their secondary weapon. Musa uses Stamina and WP. Mana pots will not regenerate your WP, but Herbal Juice will.
DIFFICULTY
PVP
PVE
SIEGE
The Musa class is a fast paced, dynamic, and fun class to play. Musa has more AoE skills with a lot more mobility and utility. Due to this they thrive in PvE. They are also quite strong in small scale PvP but their low defenses make them a little harder to master in large scale PvP. They rely heavily on their mobility and utility to survive a larger battle. New players must really keep in mind that there is quite a learning curve with any low defense class. However, just like any other class, they are very rewarding when you master them.
Check out the video below to see some examples of character creation and combat.
Source: https://youtu.be/RwSkD7q8DdA
PROS
- Fast-paced combat
- Strong is small scale PvP
- High Mobility
- AoE Focussed skills
- Sustainable Damage
CONS
- Low defense
- Weaker in large scale PvP
SKILLS
The build below is a well-rounded build for players who are level 55 or higher. It uses a total of 673 Skill Points so you have room to take additonal skills based on your preferences. Click here to view the build.
If you are currently leveling or have just reached level 50 and are lacking in Skill Points, you can use this minimalistic build (434 Skill Points) for an indication of which skills to take. But make sure you refer to our level 55+ build and max the extra skills as soon as you can. Click here to view the build.
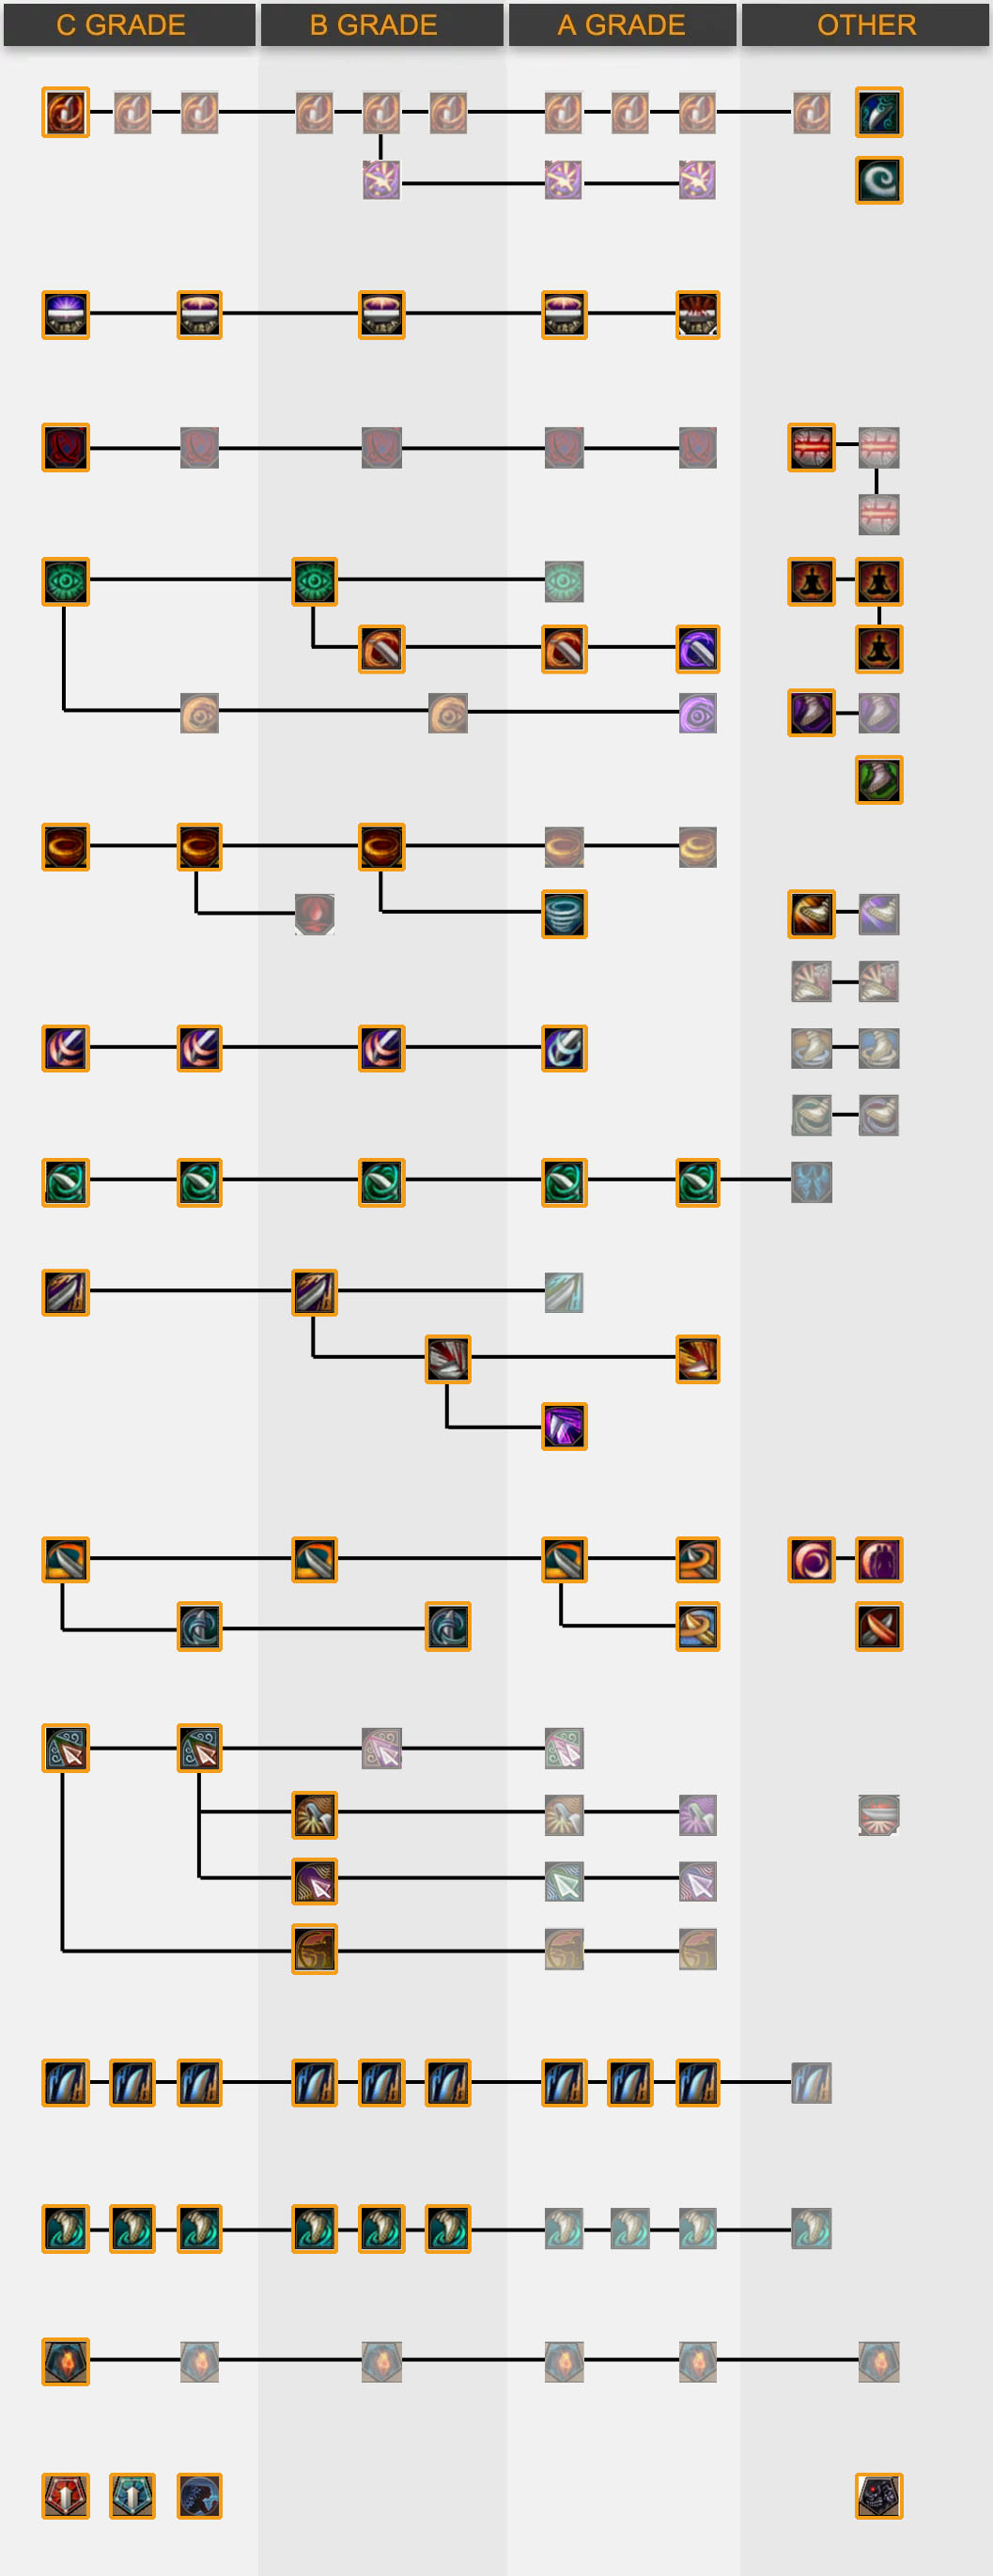
The names of skills in this build are taken from the EU/NA version and may differ from the skill calculator above.
- Keys in square brackets [] mean that you tap the key. For example, [Q] means you tap Q once.
- Keys in round brackets () mean that you hold the key. For example, (HOLD Q) means you hold Q until the next step. (PERMAHOLD Q) means you hold Q throughout the combo.
- Keys separated by a “+” symbol should be used at the same time. For example, [Q] + [LMB] means you tap Q and LMB at the same time.
- Keys separated by a “>” symbol show the order you should follow out the steps. For example, [Q] + [LMB] > [F] means you tap Q and LMB at the same time, then tap F
- [LMB] refers to left-clicking with your mouse, [RMB] refers to right-clicking with your mouse.
GENERAL
 Slice
Slice
[LMB]
 Retaliation Stance
[Q]
 Musa Spirit
[SHIFT] + [E]
 Backstep Slash
[S] + [SPACE]
 Force of Sword
Passive
 Sword Training
Passive
 Maneuver Training
Passive
 Precise Martial Arts
Passive
This is also a passive/buff which will give you 15% knock back and slow resistance.
[LMB]
This is your auto attack. It will regenerate energy with each hit but I don’t recommend maxing it until you have spare skill points, because it doesn’t deal much damage. There is also an extension to this skill called “Deep Slice” which will add a bleed effect on hit.
[Q]
This skill will block incoming attacks. You can only learn this skill by completing a level 11 Black Spirit quest. Speak to the skill instructor and he will give you a skill book as a reward. Once you unlock the skill you can use your auto attack (LMB) then use (Q) to counter attack. The counter attack is automatic as long as you block correctly. The counter attack also has a knockdown. Holding block will drain your stamina quickly so you need to learn to time it properly.
[SHIFT] + [E]
This skill will restore 80 energy. It is great for sustain and at max rank will reduce the cooldown and restore 150 energy. It only costs 1 skill point for the first rank so it’s worth putting the point in straight away but rank 2 is 10 points and rank 3 is 20 points so I would recommend only maxing this at higher level when you have most of your main build already.
[S] + [SPACE]
Backstep Slash will inflict a stagger on up to 5 targets and slow their movement speed by -30% for 10 seconds. It’s important to note that this skill can be used whilst on cooldown but will not inflict a stagger.
Passive
Force of Sword is a passive, giving you a perminant +5% critical chance buff. The skill is only unlocked by completing a Black Spirit quest.
Passive
This is your passive. It will increase your melee attack and only costs 3 skill points so I would recommend putting some points into this.
Passive
This is your passive. It will increase your melee evasion and only costs 3 skill points so I would recommend putting some points into this.
Passive
KICKS/DODGES
 Upper Kick
[F]
 Evasion
[SHIFT] + [A] OR [S] OR [D]
 Chase
Chase
[RMB] + [W] OR [S]
This is another dodge/charge skill. It can also be used by double tapping W or S. It will consume energy and will make you invincible while charging. At higher rank this skill will cost less energy and will cancel other skill animations. You can also combine this skill with your kick (F) to spam the dash. It’s important to note that when dashing forwards there is collision on this skill, but dashing backwards there is not.
[F]
This kick will knock enemies into air and then knock them back.
[SHIFT] + [A] OR [S] OR [D]
This is one of your dodge skills. It will consume stamina.
[RMB] + [W] OR [S]
HORN BOW
 Stub Arrow
[SHIFT] + [RMB]

 Arrow Grapple
Quick Slot Only
 Charged Stub Arrow
Quick Slot Only
 Stub Arrow: Evasive Shot
Quick Slot Only
[SHIFT] + [RMB]
This is your basic attack for your horn bow and all other horn bow skills extend from this one. It does have a cooldown once used but can be ignored to deal less damage. It will restore energy for each hit whilst on horseback and at higher rank it will shoot multiple arrows. This skill is great for pulling mobs when you are grinding.
Quick Slot Only
After sucessfully hitting an arrow on your enemy, press SPACE to pull yourself to the target. At max rank you can press SPACE again, whilst traveling to your enemy, to cancel the grapple.
Quick Slot Only
You can hold your horn bow auto attack (Shift + Right-Click) to fire a charged arrow. At higher ranks you can also dash while charging the arrow by pressing A or D. The charged arrow will knockdown enemies and is great for PvP.
Quick Slot Only
This skill allows you to dash/dodge (Right-Click + W/A/S/D) while firing an arrow.
DAMAGE
 Tiger Blade
Quick Slot Only
 Divider
[E]
 Whirlwind Cut
[LMB] + [A] OR [D]
 Blooming
(HOLD SHIFT) + (HOLD LMB) + (HOLD RMB)
 Blind Thrust
(HOLD LMB) > [SPACE]
 Nemisis Slash
[SPACE] after blind thrust
 Gale
Gale
(HOLD LMB) + (HOLD RMB)
 Carver
[LMB] + [SHIFT]
 Dragon Bite
[LMB] + [S]
 Dragon Claw
[LMB] during Dragon Bite
 Lunar Slash
[LMB] after Dragon Bite
 Rising Storm
[SHIFT] + [Q]
 Cyclone Slash
Quick Slot Only
 Rising Storm: Blaze
(HOLD LMB) after Rising Storm
Quick Slot Only
This skill does not have a keystroke combo and instead needs to be added to your quick skill slots. The skill has a 2 minute 30 second cooldown but will summon an extra sword and give you extra attack speed, movement speed and defense for 30 seconds. The extra sword can only be used with certain skills. These are: Slice, Dragon Bite, Dragon Claw, Ultimate: Dragon Claw, Carver, Whirlwind Cut, Divider. All skills will give lifesteal and dashes will make you invincible as you dash.
[E]
This skill will swing at the enemy giving you 2% HP Recovery, based on your maximum WP, for each target you hit. The skill is very useful to quickly regen some HP, but I wouldn’t recommend maxing it.
[LMB] + [A] OR [D]
This skill will swing three times at the enemy, applying an armor debuff at higher ranks and extending into a tornado.
(HOLD SHIFT) + (HOLD LMB) + (HOLD RMB)
Blooming can be charged by holding [SHIFT], [LMB] and [RMB] at the same time. You are invisible whilst casting and can also instantly cast the skill. However, it’s important to note that instantly casting will deal -50% damage than a full charge. Blooming has 100% critical chance and can stun up to 7 targets.
(HOLD LMB) > [SPACE]
This skill uses stamina and will restore energy. To use it auto attack using Left-Click then press SPACE to deal a powerful blow. It will also apply an accuracy reduction debuff. This skill will extend into two others named “Nemesis Slash” and “Blind Slash”. I only recommend putting skill points into “Nemesis Slash”. To use it press SPACE again (or hold) afterwards to deal a stronger blow to your enemy. This skill can’t be used on cooldown and has quite a long cooldown of 13 seconds, but deals lots of damage.
[SPACE] after blind thrust
This skill can be used after Blind Thrust to inflict a knockback. The ultimate of this skill will also heal you for 40 HP on hit and can hit a maximum of 7 targets. It’s imortant to note that the knockback does not apply in PvP.
(HOLD LMB) + (HOLD RMB)
Gale strikes 3 times, inflicting a knockback and floating effect on targets. On the 3rd strike it will also spin targets so that their back is facing you, leaving them in a vulnerable state.
[LMB] + [SHIFT]
This skill is used by holding the Shift button while auto attacking. It will knock up and knock back enemies. The skill uses stamina and will also knock down and restore energy at higher rank.
[LMB] + [S]
This skill will knock back enemies. It can be used whilst on cooldown but will not knock back. This skill is also your 100% Black Spirit Rage skill. If used with 100% Black Spirit Rage, you will begin channelling and start slashing fowards, whilst channelling you can turn your camera to change direction.
[LMB] during Dragon Bite
Dragon Claw can be used by pressing [LMB] during Dragon Bite or during the Tiger Blade version of the skill. It has 100% critical chance and is useful for comboing into other skills.
[LMB] after Dragon Bite
Lunar Slash can be used by pressing [LMB] after Dragon Bite or after the Tiger Blade version of the skill. It deals high damage and also inflicts floating and floating damage on a sucessful hit. Lunar Slash will also deal 15% of your maximum WP as bonus damage.
[SHIFT] + [Q]
This skill can also be used with a different keystroke combo (S + Left-Click + Right-Click). I would recommend using Shift and Q though because the other combo is easier to mix with others. The skill has a wide range and pulls enemies then knocks them back. It can be used on cooldown but will not knock back. This skill is also your 200% Black Spirit Rage skill. When used with 200% Black Spirit Rage, it will cast Rising Storm in a larger radius and deal high damage.
Quick Slot Only
Cyclone Slash must be placed and used on your quick slot only as it does not have a keystroke combo. The skill will send a tornado out in front of you, knocking back targets on hit and inflicting floating. The skill can hit a maximum of 5 targets.
(HOLD LMB) after Rising Storm
Rising Storm Blaze will allow you to cast Rising Storm again straight afterwards.
WEAPONS/ARMOR
The best weapons in the game are currently dropped from World Bosses.
For more information on this click here to view our World Bosses guide.
For more information on this click here to view our World Bosses guide.
For your primary weapon, the  Liverto is without a doubt the best weapon you can get (besides Kzarka). You will want to upgrade it to +15 or higher as soon as possible. If you don’t have the budget for this weapon then the
  Yuria weapon is what you should be using in the mean time while you save up enough silver for Liverto.
For your off-hand,  Black Horn Bow is better for PvP because it gives you accuracy. I would highly recommend using the Black Horn Bow. If you want to go for pure AP then the
  White Horn Bow is another alternative.
The best armor in the game is currently dropped from Bosses.
 Giath’s Helmet (helmet) – dropped from Giath.
 Hebetate Tree Spirit’s Armor (chest) – dropped from the Dim Tree Spirit.
 Bheg’s Gloves (gloves) – dropped from Bheg.
 Muskan’s Shoes (shoes) – dropped from Monastery Leader.
The full set will give you HP Recovery +100, Maximum MP/WP/SP +100, Maximum HP +100, Accuracy +1, Evasion +1, Attack Speed +1, Casting Speed +1
In the mean time you should be using one of the following two armor sets:
The full set will give you HP Recovery +100, Maximum MP/WP/SP +100, Maximum HP +100, Accuracy +1, Evasion +1, Attack Speed +1, Casting Speed +1
In the mean time you should be using one of the following two armor sets:
A popular armor choice for Musa is the 


 Grunil set. It increases your maximum HP and will give you 2 socket slots on each piece, along with extra AP if you have the full set. Another advantage of using this set is that it is viable on any class, allowing you to swap to another class easily.
I would however, highly recommend mixing both armor sets by using the Grunil Helmet,  Taritas Chest, Grunil Gloves and
  Taritas Shoes. This allows you to get the 2 set bonus from each set, giving you a total of +5 AP, +20 HP and +120 WP.
ACCESSORIES
These are the best accessories in the game. They do cost a significant amount of silver.
 Red Coral Earring x2
 Blue Coral Ring x2
 Ancient Guardian’s Seal x1
 Ancient Weapon Core x1
AP +4, DP 4, Weight Limit +50LT
Ancient Weapon Core x1
AP +4, DP 4, Weight Limit +50LT
AP +2, Accuracy +3, Endurance +50
AP +5, Max MP/WP/SP +25
AP +6, DP 2
If you don’t have enough silver for the best accessories, these are a good temporary alternative.
 Bares Earring x2
 Ring of Good Deads x2
 Bares Necklace x1
 Bares Belt (OR any with AP) x1
AP +2
Bares Belt (OR any with AP) x1
AP +2
AP +4
AP +2, Accurracy +1
AP +4
Please note that Red Coral and Blue Coral Accessories are currently not in the EU/NA version. Currently, the best earrings for Musa are Witch’s Earring and the best rings are Mark of Shadow. Ancient Core Accessories are also hard to obtain and you may want to go for cheaper alternatives such as a Bares Necklace (PRI/DUO) and Belt of Sultz the Gladiator.
SOCKETS (CRYSTALS)
These are an example of the best sockets for your class. They do cost a significant amount of silver.
 Ancient Magic Crystal – Carmae x2
(weapon)
 Black Spirit Crystal x1
(sub-weapon)
 Magic Crystal of Infinity – Intimidation x2
(helmet)
Ancient Magic Crystal – Cobelinus
X1 (chest)
 Magic Crystal of Infinity – Assault X2
(gloves)
 Red Battlefield Crystal – Adamantine
X1 (shoes)
(weapon)
Critical Chance +1, Attack Speed +1
(sub-weapon)
Maximum HP +100, AP +5
(helmet)
Knockdown/Bound Resistance +10%
X1 (chest)
Maximum HP +100, Weight Limit +20LT
(gloves)
Attack Speed +2
X1 (shoes)
Knockdown Resistance +5%, Stun/Freeze/Slow Resistance +5%
If you don’t have enough silver to afford the better sockets, these are much cheaper and a good temporary alternative.
Magic Crystal – Destruction
(weapon) x1
 Magic Crystal of Infinity – Air Attack
(sub-weapon) x1
Magic Crystal of Enchantment – Intimidation
(helmet) x2
 Magic Crystal of Abundance – Vigor X2
(chest) x1
Magic Crystal of the Sun – Assault
(gloves) x1
 Magic Crystal of the Sun – Valor
(gloves) x1
 Magic Crystal of Nature – Swiftness
(shoes) x1
Movement Speed +1
(weapon) x1
Attack Speed +1
(sub-weapon) x1
Additional Air Attack Damage +1
(helmet) x2
Knockdown/Bound Resistance +5%
(chest) x1
Maximum HP +25
(gloves) x1
Attack Speed +1
(gloves) x1
Critical Hit Rate +1
(shoes) x1
Commentaires
Enregistrer un commentaire